Category: Uncategorized

  • Molded Pulp and Thermoformed Inserts: A Materials Deep-Dive

    Molded Pulp and Thermoformed Inserts: A Materials Deep-Dive

    “Molded insert” is not one material. It spans a family of fiber parts that ranges from a rough, half-inch-thick appliance cradle to a smooth, thin-walled cosmetic tray, plus the thermoformed plastic trays that compete with them on clarity and precision. Choosing well means understanding what each process can actually form, how much it protects, and what it costs you in tooling, lead time, and recyclability. This is a materials-level look at molded pulp and thermoformed inserts so you can match the process to the product rather than to whatever a supplier happens to run.

    The molded fiber family, sorted by wall thickness

    Molded fiber is grouped by how it is formed, and wall thickness is the quickest way to tell the types apart. Thick-wall parts run roughly 3/16 to 3/8 of an inch, about 4.8 to 9.5 millimeters, with a smooth inner face and a rough outer one; this is the heavy-duty end used for appliances, automotive parts, and glass containers. Transfer-molded parts sit around 1/8 to 3/16 of an inch, near 3.2 to 4.8 millimeters, and allow more precise detail, which is why they carry electronics and lighter consumer goods. Thermoformed thin-wall fiber is thinner still, about 3/32 to 5/32 of an inch, roughly 2.4 to 4.0 millimeters, and is dried directly in the mold to produce smooth surfaces with minimal draft, the look you see under cosmetics and specialty retail.
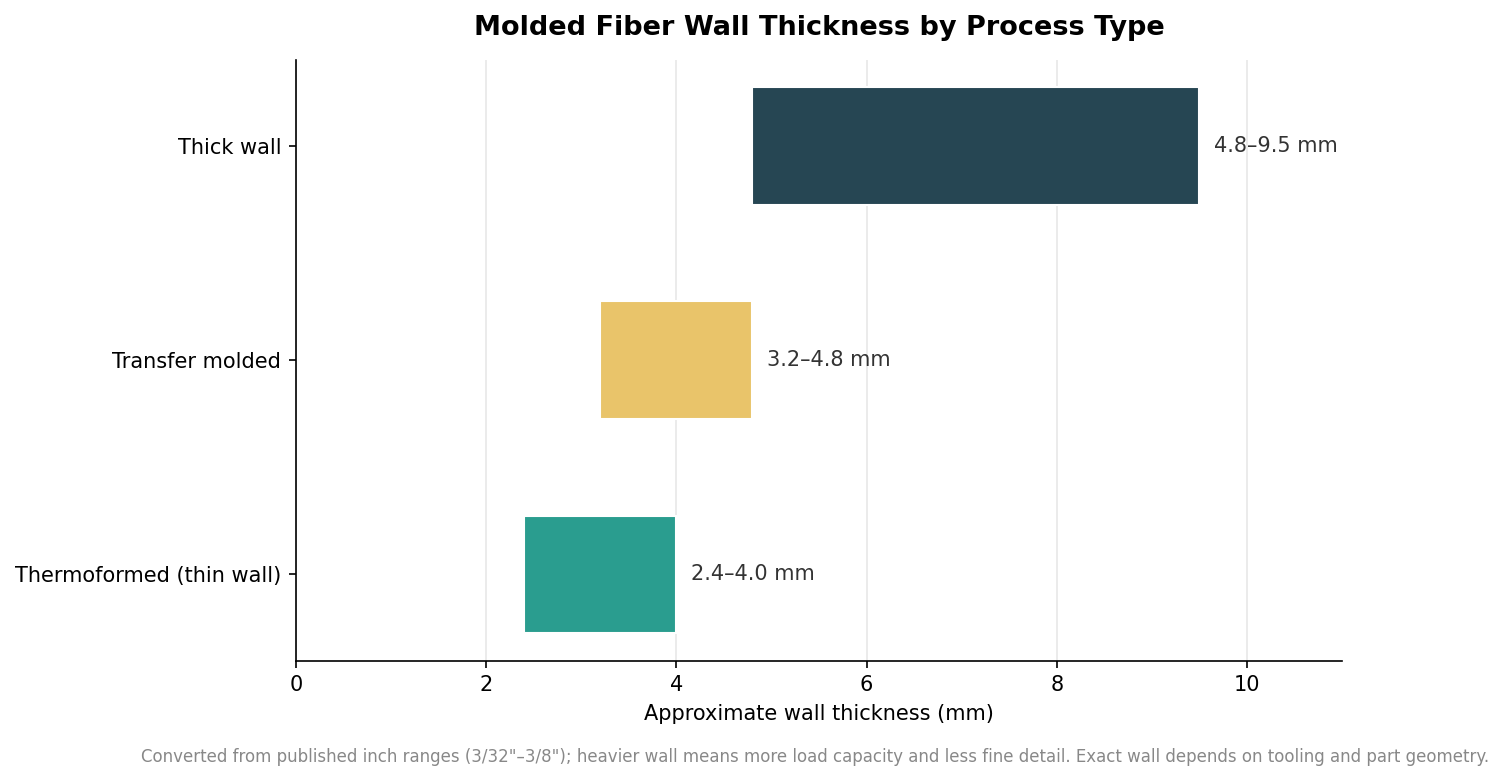
    Horizontal bar chart of molded fiber wall thickness ranges: thick wall 4.8 to 9.5 mm, transfer molded 3.2 to 4.8 mm, thermoformed thin wall 2.4 to 4.0 mm
    Molded fiber types sorted by wall thickness; heavier walls carry more load, thinner walls give finer detail.

    A fourth category, often called processed molded fiber, is any of the above taken through secondary steps such as die-cutting, hot pressing, coloring, or printing to create hinged, ventilated, or branded parts. That extra finishing raises both cost and lead time, so it is worth requesting only where the presentation genuinely calls for it. As a rule, thicker walls buy load capacity and forgiving tooling, while thinner walls buy finish and detail at a higher unit cost and a narrower protection window.

    What molded pulp can and cannot form

    Fiber has real geometric limits, and designing against them prevents disappointment. Because wet fiber springs back as it dries, molded pulp holds looser dimensional tolerances than injection or thermoforming, so it is a poor choice when a part must snap precisely to a rigid component. Minimum wall thickness is around 0.7 millimeters for wet-pressed parts, draft angles typically need to be in the 3 to 5 degree range so the part releases from the tool, and true undercuts are not possible without secondary operations. Pulp is also opaque at every specification, which rules out any design that depends on seeing the product through the tray. None of this makes pulp weak; it makes it a material you design nests and pockets for with generous radii and draft, rather than tight snap features.

    Thermoformed plastic where precision or clarity wins

    Thermoformed plastic trays, usually PET or its recycled form rPET and sometimes PVC, exist for the cases pulp cannot cover. They achieve tighter dimensional tolerances, form thinner walls, can be molded with undercuts and snap detail, and offer a transparent option that shows the product on a retail shelf. That precision is why electronics kitting, medical device trays, and premium retail sets often specify a clear formed tray. The trade-offs are environmental and mechanical: a rigid plastic tray transmits impact more directly to the product and, on the disposal side, is rarely accepted curbside. If clarity or a precise fit to a hard product is the priority, thermoformed plastic earns its place; if it is not, the case for fiber gets stronger quickly.

    How each material actually absorbs shock

    Protection works differently across these materials, and the mechanism matters more than a single cushioning number. Molded pulp absorbs energy through progressive fiber deformation: the wall crushes gradually and spreads the load, and it holds up better than expanded foam across temperature swings. A rigid thermoformed plastic tray does little cushioning of its own; it locates and immobilizes the product, then relies on the outer box and any secondary cushioning to manage a drop, and it transmits a sharp impact fairly directly. That difference should steer the choice: for a dense, drop-sensitive product, a crushable fiber nest often does more real protective work than a rigid formed tray, while for a light product that mainly needs to be held in position and displayed, the rigid tray is fine. Where the load is high or the drop testing is demanding, validate the specific nest with samples rather than assuming a material class will pass.

    Recyclability, lead time, and making the call

    The last two variables are usually recyclability and schedule. Molded pulp has two clean end-of-life routes, since unsoiled parts recycle in standard paper streams and soiled ones can be composted, which is why its recyclability rating sits far above thermoformed plastic in most guides. If a plastic-free or curbside-recyclable claim is part of your brand promise, fiber is the straightforward answer. Schedule is the counterweight. Simple die-cut corrugated inserts can turn in roughly one to two weeks, and printed paperboard trays in about ten to twenty days, but any custom-tooled molded part, whether pulp or plastic, commonly takes on the order of three to five weeks at low volume because a tool has to be cut first.
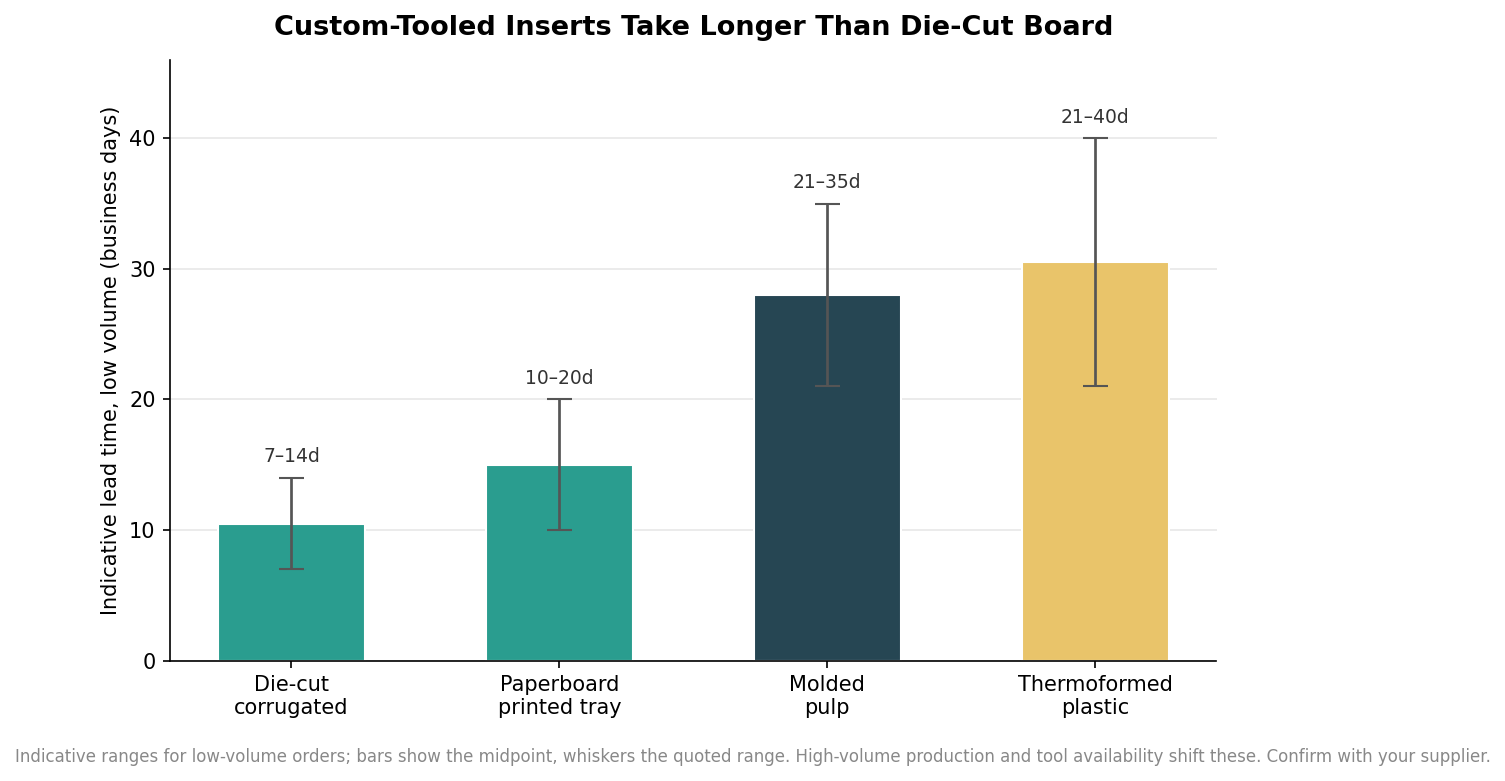
    Bar chart of indicative low-volume lead times: die-cut corrugated 7 to 14 days, paperboard tray 10 to 20, molded pulp 21 to 35, thermoformed plastic 21 to 40 days
    Custom-tooled molded inserts take longer than die-cut board because a tool must be cut first.

    Put together, the decision usually resolves cleanly. Choose molded pulp when you want crushable, sustainable protection for a product that does not demand tight tolerances or visibility, and accept the tooling lead time and looser fit that come with fiber. Choose thermoformed plastic when precision, snap retention, or shelf visibility genuinely drive the design, and you can accept the weaker recyclability. And where volumes are low or the timeline is short, a die-cut corrugated insert may protect the product well enough without any custom tool at all. Match the process to the product’s real requirements, prototype the nest, and confirm it against your own drop testing before committing to a tool.
  • Plastic-Free Box Inserts: Recyclable Options and the Rules Driving the Switch

    Plastic-Free Box Inserts: Recyclable Options and the Rules Driving the Switch

    Expanded polystyrene, the white foam that has cradled fragile products for decades, is quietly being designed out of the box. Some of that pressure comes from customers who now judge a brand by the packaging waste it leaves on the doorstep, but a bigger share comes from law. A growing set of states is making the company that puts packaging on the market pay for what happens to it afterward, and that changes the arithmetic on every insert you spec. If you are choosing box inserts in 2026, the material question and the compliance question have become the same question.

    The rules are why this is urgent

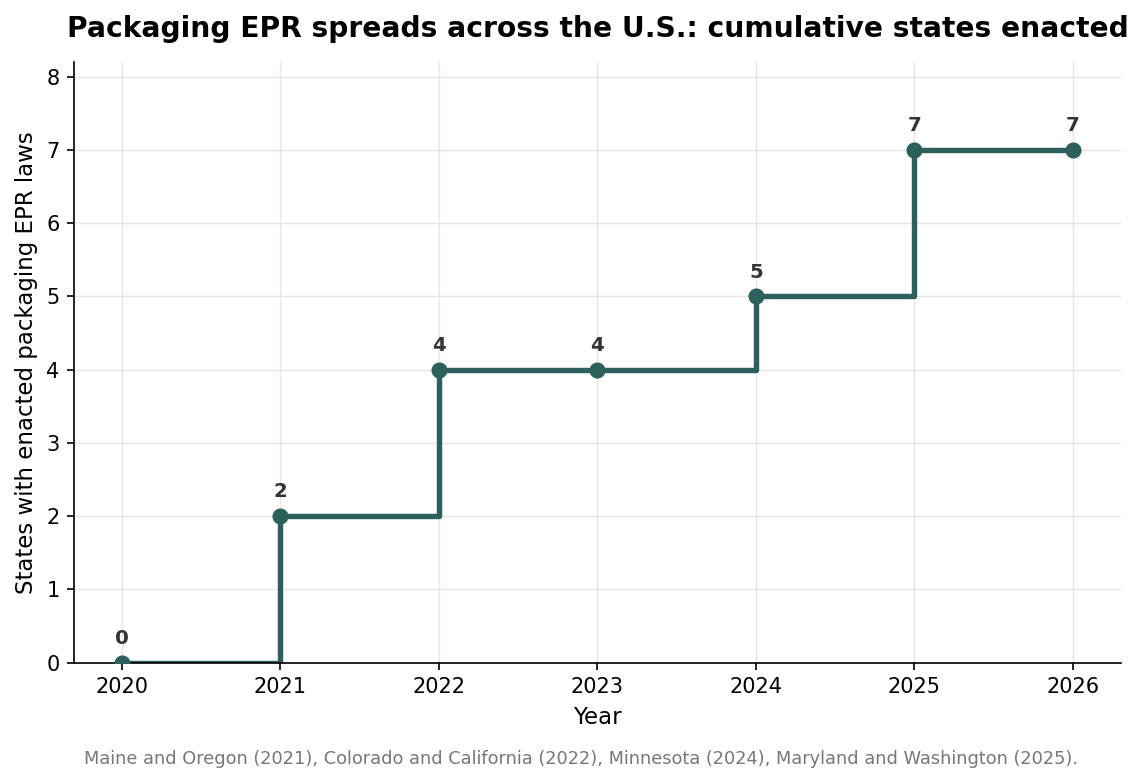
    Seven states now have packaging extended producer responsibility laws on the books: California, Oregon, Colorado, Maine, Minnesota, Maryland, and Washington. Extended producer responsibility, or EPR, shifts the cost of collecting and recycling packaging from municipalities to the producers who sell it. Maine and Oregon passed the first such laws in 2021, California and Colorado followed in 2022, and the count has climbed steadily since, as the chart below shows.

    Step line chart showing cumulative U.S. states with enacted packaging EPR laws rising from zero in 2020 to seven by 2026
    The number of states with packaging EPR laws has climbed to seven, each one attaching a fee to packaging design.

    The mechanism that matters most for insert selection is eco-modulation. Under these programs the fee a producer pays is not flat; it flexes with how recyclable and how material-efficient the packaging is. Design something that flows cleanly through existing paper recycling and you sit toward the low end of the fee schedule. Ship a fragile item in mixed foam-and-plastic that no curbside program will take, and you pay more, potentially for years. California has gone furthest, with a statutory goal that all covered packaging meet minimum recyclability standards by 2032. The insert you choose today is a line item on a fee schedule tomorrow.

    What “recyclable” now has to mean

    Curbside-recyclable is the bar, not just recyclable in theory. A material that can technically be recycled at a specialized facility does little for a fee calculation or a customer if it cannot go in a household bin. Fiber-based inserts, meaning molded pulp and corrugated board, clear that bar in most of the country because they ride along with the paper and cardboard stream people already sort. Expanded polystyrene generally does not; it is excluded from most curbside programs and is outright restricted or banned in a number of states.

    The second rule is to avoid mixing materials that have to be separated by hand. A paperboard tray with a bonded plastic film, or a corrugated box lined with glued foam, asks the consumer to pull the package apart before recycling, and most will not. The cleanest compliance story, and the simplest one to explain on a label through a program like How2Recycle, is a mono-material insert: paper protecting the product, so the whole package goes in one bin.

    Molded pulp, the direct foam replacement

    Molded pulp is the closest fiber analog to custom foam for contoured, fragile goods. It is formed from recycled paper slurry pressed into a product-specific cavity, so each unit sits in its own pocket with no movement and no contact between pieces. That makes it a strong fit for bottles, jars, candles, cosmetics, and consumer electronics that need to be held rather than merely cushioned. Because it is made from recycled paper, it is curbside recyclable and often home compostable, which gives it the best end-of-life profile of the common insert materials.

    The tradeoff is tooling. A molded pulp cavity requires a custom mold, so there is an upfront tooling investment and a lead time to cut it, which pushes the economics toward larger and repeat runs rather than one-off small batches. Treat exact tooling costs and minimums as supplier-specific and get them quoted against your real annual volume, because the per-unit price falls as the run grows and the mold amortizes. Molded pulp also has practical limits on wall thinness and fine detail, so very small or oddly geometric parts sometimes protect better in foam or a die-cut design.

    Corrugated and honeycomb, the workhorses

    Die-cut corrugated is the least expensive protective insert and the fastest to bring up, because it uses steel-rule dies rather than molds. Partitions, cells, trays, and folded cradles organize a box, keep units from knocking together, and add stacking strength, which is why they dominate multi-pack and kit configurations. Corrugated is a shining recycling story, but it cushions less than it organizes, so for genuinely fragile single items it is usually a structure that positions the product rather than the sole line of defense against a drop.

    Where you need real shock absorption without leaving the paper stream, honeycomb kraft is the material to know. Its hexagonal paper core absorbs impact and distributes load much like expanded foam, which is why it is a leading foam alternative for corner blocks, edge protection, and heavier goods. It is recyclable with paper, ships flat before it is expanded, and pairs well with a corrugated outer for a fully fiber-based system. Between molded pulp for contoured cradling, corrugated for structure, and honeycomb for cushioning, most products that once shipped in foam can be re-solved in paper.

    Time the switch around the fee calendar

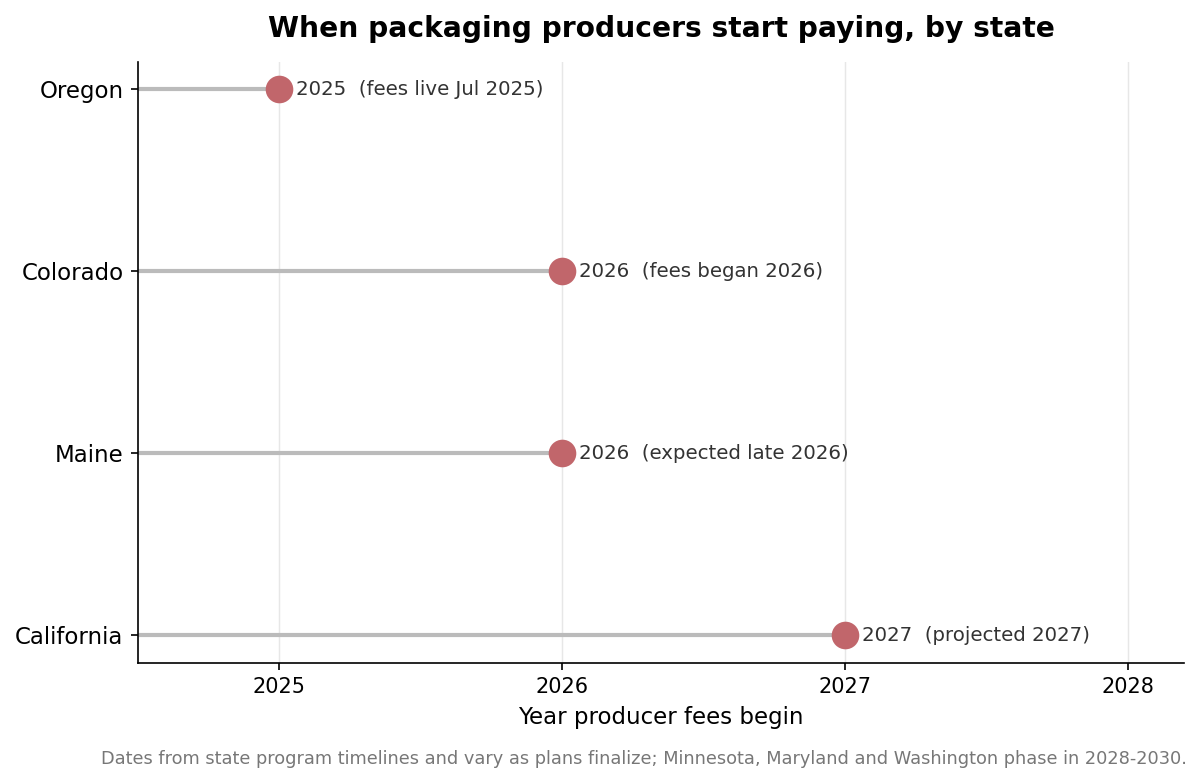
    Producer fees do not all start at once, and that timing is a planning tool. Oregon’s fees went live in mid-2025 and Colorado’s began in 2026, with Maine expected to follow later in 2026 and California projected for 2027; Minnesota, Maryland, and Washington phase in over the following years. The chart below lays out the near-term dates.

    Dot plot showing the year producer fees begin in Oregon (2025), Colorado (2026), Maine (2026), and California (2027)
    Producer fees phase in state by state, giving brands a calendar to plan a switch against.

    The practical move is to align your redesign with your own tooling lead time rather than with the first invoice. If a molded pulp mold takes weeks to cut and prove out, and your largest markets bring fees online in 2026 and 2027, then a switch started now lands comfortably ahead of the deadline and lets you sell through existing foam stock in an orderly way. Waiting until the fee notice arrives compresses the same work into a scramble. The brands that come out ahead treat the plastic-free insert not as a compliance cost to defer, but as a design decision to make once, cleanly, while there is still time to test it against a real drop.

  • Corrugated Box Insert Types: Choosing Partitions, Trays and Film

    Corrugated Box Insert Types: Choosing Partitions, Trays and Film

    When people say they need a box insert, they usually mean one of several very different things. A wine shipper, a phone retail box, and a case of glass jars all need an insert, but the right structure for each is not the same, and choosing the wrong one either fails to protect the product or wastes money on protection it does not need. The useful way to choose is to start from the way the product is likely to be damaged and work back to the insert style that prevents it. This guide walks through the main corrugated and film insert types and where each one earns its place.

    Match the insert to the failure you are preventing

    Products fail in transit in a few characteristic ways. They knock into each other, they slide and hit the box wall, they take a drop that shocks the whole package, or their surface gets scuffed. Each failure mode points to a different insert. Items that damage each other need separation. Items that slide need to be located and held. Items that are shock-sensitive need cushioning or suspension. Once you name the specific risk for your product, the field of insert options narrows quickly, and you avoid the common trap of paying for a heavily engineered insert when a simple one would have done the job.

    Layer pads and partitions: the corrugate workhorses

    The simplest inserts are flat pads: sheets of corrugated placed at the bottom, top, or between stacked layers. They add stacking strength, keep layers from rubbing, and cost very little, which makes them the default for flat or stackable goods that are not especially fragile. When the risk is item-to-item contact, partitions take over. A partition, sometimes called a cell divider, is a lattice of interlocking corrugated strips that creates an individual pocket for each unit. This is the standard protection for bottles, wine, jars, and glassware, where the whole point is to make sure two glass surfaces never touch during a rough handling event. Partitions are lightweight and cost-effective, and because they are cut to your product count and dimensions, they hold each item in its own space through the trip.

    Die-cut trays: nesting the product

    When you want a product located precisely, presented well, or held in a specific orientation, a die-cut insert or tray is the answer. This is a piece of corrugated cut and scored so the product nests into a shaped cavity, common in retail boxes and kits where the insert does double duty as protection and as the first thing the customer sees on opening. A tray keeps a product from sliding into the box wall and gives a clean, deliberate unboxing. The tradeoff is tooling and fit: because the cavity is cut to the product, you need a cutting die and an accurate product profile, and design changes to the product can mean a new die. For a stable product sold in volume, that upfront cost amortizes well; for a rapidly changing product, it is a consideration.

    Suspension and retention: film for the fragile and the premium

    For genuinely shock-sensitive items, film-based inserts change the physics. In suspension packaging, the product is held between two membranes of flexible film stretched across a corrugated frame, so it floats in the center of the box and the film absorbs a drop before the shock reaches the product. It is a strong choice for electronics and fragile high-value goods. Retention packaging works the other way around: a single film sheet holds the product against a tray or backing board, which suits lighter items and gives a striking, product-forward presentation because the item appears to be floating against the film. Retention leans toward presentation and light protection; suspension leans toward maximum drop protection. Both cost more per unit than plain corrugate, so they are worth it when the product’s fragility or value justifies the spend.

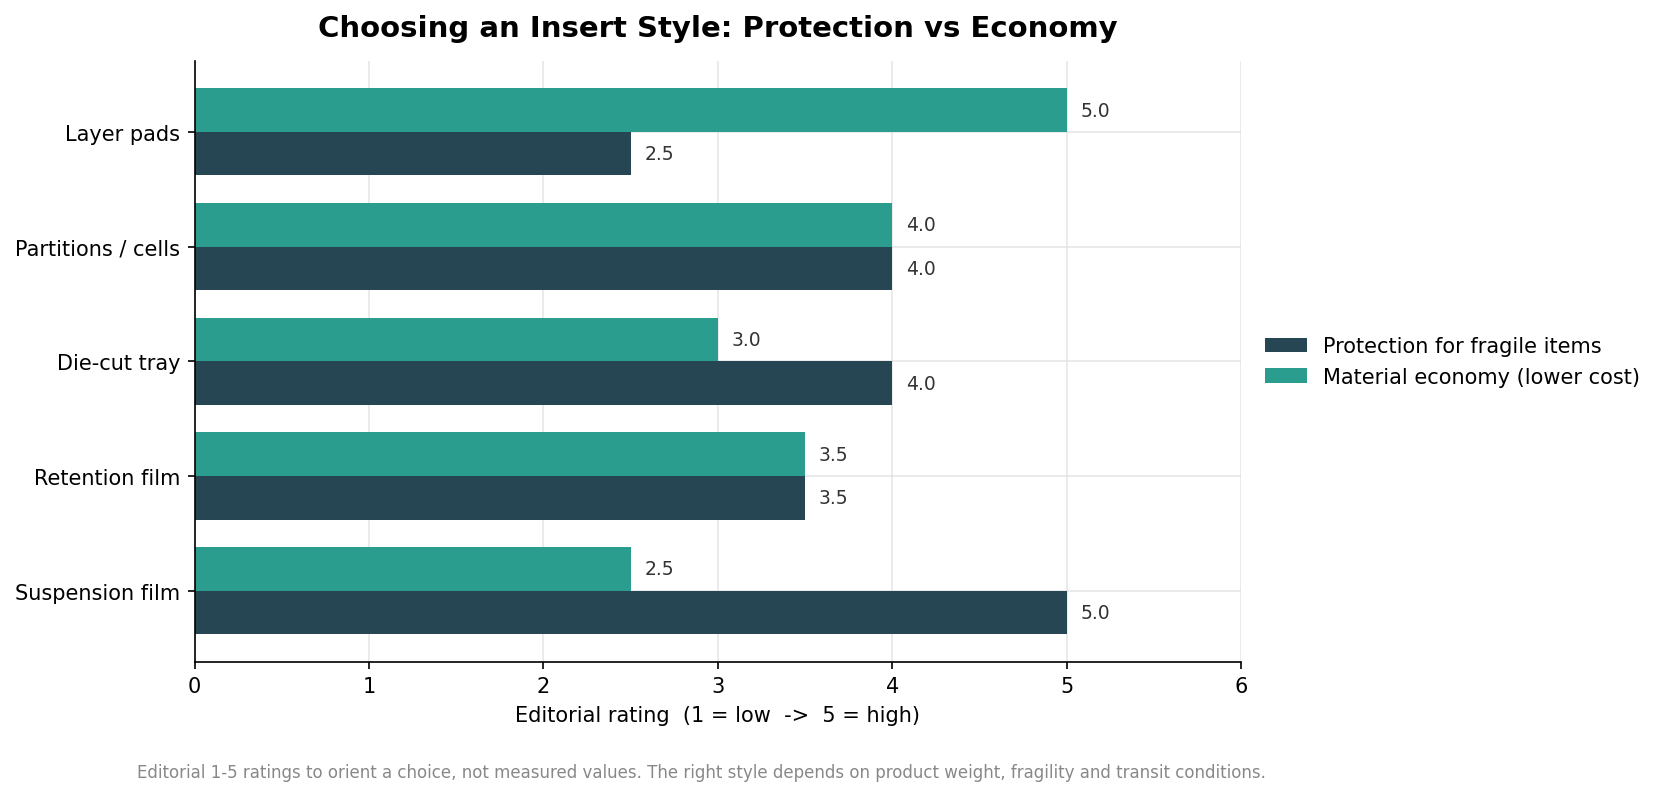
    Grouped horizontal bar chart rating insert styles on protection for fragile items versus material economy
    Where each insert style lands on protection versus material cost, as a selection guide.

    The chart above places these styles against two things buyers weigh constantly: how well the style protects a fragile item, and how economical it is on material. Treat the ratings as orientation rather than measurement, but the pattern is real. Layer pads are cheap but offer the least protection for something fragile; suspension film offers the most protection but the least material economy; and partitions and trays sit in the useful middle where most everyday products live.

    The spec under the shape: flute and board

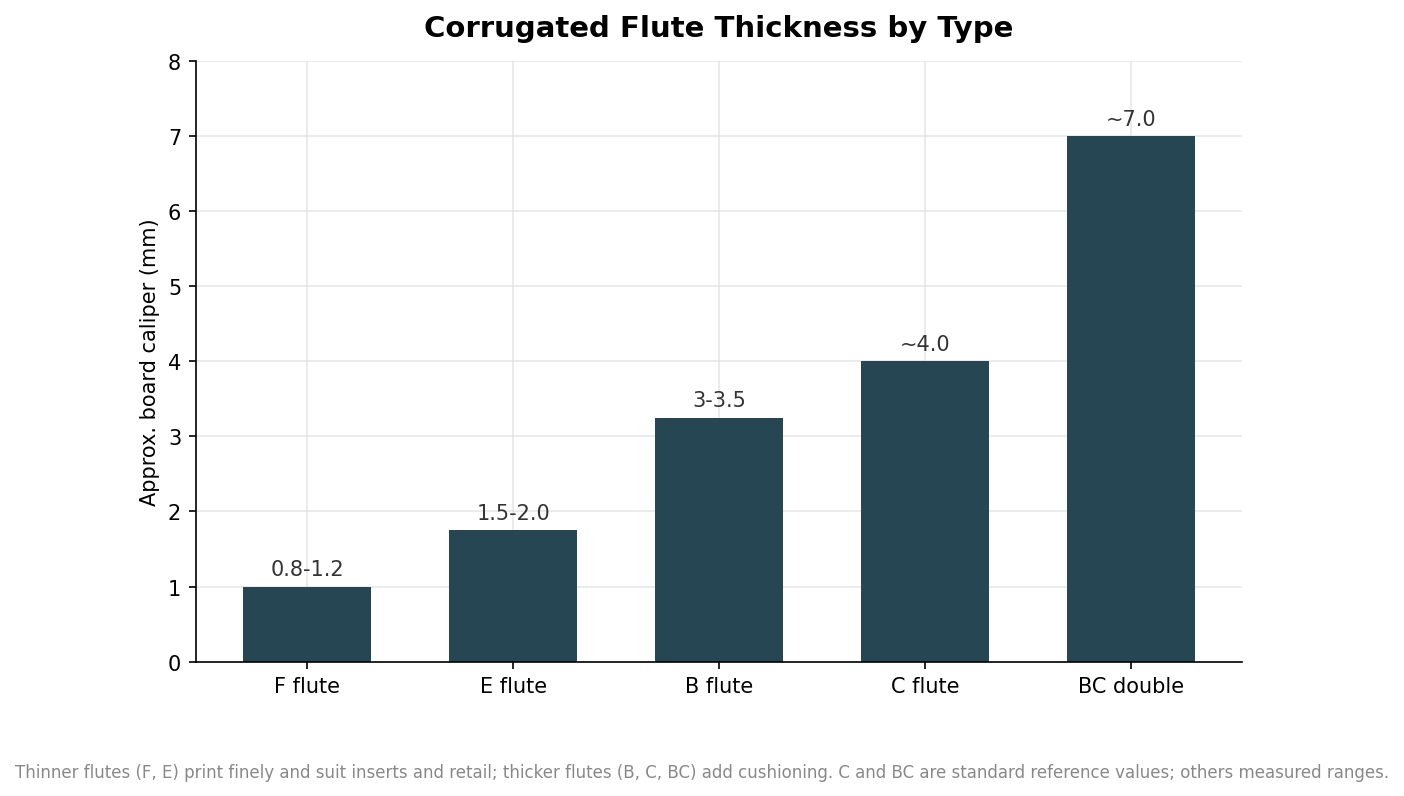
    Whatever shape you choose, the corrugated board it is made from has its own spec, and the flute profile is the part that matters most for inserts. Flute is the wavy fluting between the liners, and it comes in grades. F flute is thin, roughly 0.8 to 1.2 millimeters, and prints finely, which suits small retail inserts. E flute at about 1.5 to 2 millimeters is a common insert and e-commerce board. B flute at roughly 3 to 3.5 millimeters adds cushioning and stiffness for heavier or more fragile goods, C flute is a touch thicker at around 4 millimeters, and BC double wall, near 7 millimeters, stacks two flutes for maximum strength.

    Bar chart of corrugated flute thickness by type: F, E, B, C flute and BC double wall in millimeters
    Flute profile sets both the print surface and the cushioning of an insert.

    The rule of thumb is straightforward: thinner flutes give you a smoother print surface and a slimmer insert, while thicker flutes give you cushioning and rigidity. A printed retail tray might use E or F flute for its finish, while a partition holding heavy jars leans on B or C for strength. Getting the flute right is how an insert that looks correct on paper actually survives the load it carries.

    How to choose, and what to confirm

    Put the pieces together by working from the product outward. Name the failure mode, pick the style that prevents it, then choose a flute heavy enough for the weight and fragile enough in print for the presentation you want. Confirm the fit against a real product sample rather than a drawing, because a millimeter of slack is the difference between a snug insert and one that lets the product rattle. Expect corrugated inserts to be quoted on your exact length, width, depth, product count, and weight, and note that minimum order quantities for die-cut and partition work commonly range from around a thousand units into the tens of thousands, so the per-unit cost drops sharply with volume. If your product ships in real quantity and its damage rate matters, it is also worth validating the chosen insert with a transit or drop test before committing to a large run, so the insert you scale is one you have actually seen protect the product.

  • Foam vs. Cardboard Inserts: How to Choose

    Foam vs. Cardboard Inserts: How to Choose โ€” Custom Box Inserts
    Call or Text us: (929) 605-4397 โ€” free design proof in 24โ€“48 hours

    Home โ€บ Blog โ€บ Foam vs. Cardboard Inserts

    Buyer Guides

    Foam vs. Cardboard Inserts: How to Choose

    Almost every insert decision comes down to one question: what does your product actually need to survive the trip? Foam and cardboard both hold an item in place, but they protect it in different ways. Foam absorbs shock and cradles fragile or heavy goods. Die-cut board positions and separates items cleanly and recyclably. Picking the wrong one either leaves your product exposed or adds cost you did not need.

    This guide walks the five variables that decide it โ€” weight, fragility, value, sustainability goals, and budget โ€” and gives you a straight comparison so you can point at the right material before you ever request a quote.

    Start with product weight

    Weight is the fastest filter. Heavy products load the insert with more force during a drop, and that force has to go somewhere. Cardboard partitions carry compressive load well but do little to dissipate impact energy. Above roughly two to three pounds per item, or with any dense metal or glass component, cushioning foam becomes the safer call. We spec foam densities from 1.2 to 9.0 lb/ftยณ, so a heavier product simply moves you up the density scale rather than off foam entirely.

    Light retail goods โ€” a bottle, a folded garment, a small accessory โ€” rarely generate enough impact energy to need foam. For those, die-cut board is lighter, cheaper, and often looks better on the unboxing.

    Then weigh fragility and value

    Fragility is about how much shock the product can take before it fails, not how heavy it is. A lightweight ceramic or a bare circuit board can be delicate and low-mass at the same time. When the failure threshold is low, foam earns its place because it lowers the peak deceleration the product feels on impact. Value compounds this: the more a single unit costs to replace or return, the more a few cents of extra cushioning pays for itself.

    If your product is both light and rugged โ€” think a hard-cased tool or a sealed consumable โ€” board is usually enough, and foam is over-engineering.

    Compare them side by side

    FactorFoam inserts
    Best for weightMedium to heavy items; dense metal, glass, optics
    Best for fragilityFragile, shock-sensitive, high-value goods
    Protection typeAbsorbs and dissipates impact energy; cradles
    SustainabilityPE and EVA recyclable in some streams; PU less so
    Relative costHigher material cost; worth it when returns hurt
    Unboxing feelPremium, protective, snug retention
    FactorCardboard inserts
    Best for weightLight to medium retail and e-commerce goods
    Best for fragilityRugged or sealed products that mainly need positioning
    Protection typeSeparates, locates, and restrains movement
    SustainabilityFully recyclable; strong story for retail brands
    Relative costLower unit cost, especially at volume
    Unboxing feelClean, brand-forward, printable surfaces
    Key Takeaway

    Choose foam when impact protection is the job โ€” heavy, fragile, or high-value products. Choose cardboard when the job is clean positioning of lighter, rugged goods and recyclability matters. When in doubt, weight and replacement cost break the tie.

    Factor in sustainability goals

    Recyclability is now a real buying criterion, especially for retail and subscription brands. Die-cut corrugated board drops into the same curbside stream as the box itself, which makes it the cleanest story to tell on the package. Foam is more nuanced: polyethylene (PE) and EVA are recyclable in some streams, while polyurethane (PU) generally is not. If a sustainability claim is central to your brand, board wins unless the product genuinely needs cushioning it cannot get from paper.

    Let budget settle the edge cases

    For the same footprint, die-cut board usually carries a lower unit cost than routed foam, and the gap widens at volume. But budget should be the last filter, not the first. Under-protecting a fragile product to save a few cents per unit is a false economy once you count damaged returns, replacement shipping, and the reviews that follow. Start from what the product needs, then optimize cost within that material.

    Not sure which way to go?

    Send us your product dimensions and weight. We will recommend foam or board, cut a proof in 24โ€“48 hours, and quote both if it is a close call.

    Get a Custom Quote

    Keep reading

    Once you know the material family, the next question is which grade. If you are leaning foam, read PE, PU, EVA & ESD Foam Explained to match density to protection. Shipping something fragile? How We Spec Cushioning for Drop Tests shows how we turn fragility and drop height into a real spec. You can also browse the full range on our products page.

    undefined
  • PE, PU, EVA & ESD Foam Explained

    PE, PU, EVA & ESD Foam Explained โ€” Custom Box Inserts
    Call or Text us: (929) 605-4397 โ€” free design proof in 24โ€“48 hours

    Home โ€บ Blog โ€บ PE, PU, EVA & ESD Foam Explained

    Materials

    PE, PU, EVA & ESD Foam Explained

    Foam is not one material. The four types we cut most often โ€” polyethylene, polyurethane, EVA, and ESD โ€” behave differently under load, feel different in the hand, and cost different amounts. Choosing well means matching the foam to the job, not defaulting to whatever is cheapest or whatever the last supplier used.

    Below is a plain guide to each foam, how density changes what it does, and the situations where each one is the right answer. We stock densities from 1.2 to 9.0 lb/ftยณ, and density matters as much as the polymer itself.

    Polyethylene (PE)

    PE is a closed-cell foam and the workhorse of protective packaging. Closed cells mean it does not soak up water and it holds a routed cavity crisply, so it locates a product precisely. It resists repeated impacts without collapsing, which makes it the default for medium-weight electronics, tools, and instruments. PE also has a clean, firm feel that reads as premium in a fitted case.

    Polyurethane (PU)

    PU is an open-cell foam that is softer and more compressible than PE. That softness makes it excellent for delicate, low-mass items and for convoluted (egg-crate) lids that press gently down on a product. It is lighter and typically cheaper per volume, but it recovers more slowly after heavy repeated impacts and is less water-resistant. Reach for PU when the product is fragile and light rather than heavy.

    EVA

    EVA is a denser, more resilient closed-cell foam with a smooth, high-end surface finish. It is the choice when the insert itself is part of the product experience โ€” premium tool cases, cosmetics kits, and presentation packaging โ€” because it looks and feels like a finished good. It carries load well and holds fine detail in routed cavities, at a higher material cost than PE.

    ESD (anti-static)

    ESD foam is engineered to safely dissipate static charge, which protects sensitive electronics from electrostatic discharge. It comes in static-dissipative and conductive grades and is usually pink or black so it is easy to identify on the line. Use it whenever bare boards, drives, or static-sensitive components are involved. It is not a general upgrade โ€” it is a requirement for specific products.

    Compare the four foams

    FoamCell / feel
    PE (polyethylene)Closed-cell, firm, water-resistant
    PU (polyurethane)Open-cell, soft, compressible
    EVAClosed-cell, dense, premium finish
    ESD (anti-static)Static-dissipative or conductive
    FoamBest use
    PE (polyethylene)Medium-weight electronics, tools, instruments
    PU (polyurethane)Light, fragile items; convoluted lid cushions
    EVAPremium cases where the insert is on display
    ESD (anti-static)Bare boards, drives, static-sensitive parts
    Key Takeaway

    PE is the reliable default, PU is the soft option for light fragile goods, EVA is the premium finish, and ESD is a requirement โ€” not an upgrade โ€” for static-sensitive electronics. Then dial in density from 1.2 to 9.0 lb/ftยณ to match the product’s weight.

    How density changes the protection

    Within any foam type, density controls firmness and how much load the material carries before it bottoms out. Low-density foam (around 1.2 to 1.7 lb/ftยณ) is soft and best for light products; it deflects easily and returns a gentle cushion. High-density foam (up to 9.0 lb/ftยณ) resists compression and supports heavy items without collapsing under repeated handling. The right density spreads the product’s weight over enough foam that peak impact stays below the product’s failure threshold. Too soft and a heavy item bottoms out onto the box; too firm and a light item gets a harsh, unforgiving stop.

    Want the right foam and density spec’d for you?

    Tell us your product weight and fragility. We will recommend the foam type and density, then cut a free proof in 24โ€“48 hours.

    Get a Custom Quote

    Keep reading

    Choosing between foam and paper first? Start with Foam vs. Cardboard Inserts: How to Choose. To see how density and thickness get set against a real drop, read How We Spec Cushioning for Drop Tests. For ESD specifically, see ESD Foam for Electronics. Full material options live on our products page.

    undefined
  • How We Spec Cushioning for Drop Tests

    How We Spec Cushioning for Drop Tests โ€” Custom Box Inserts
    Call or Text us: (929) 605-4397 โ€” free design proof in 24โ€“48 hours

    Home โ€บ Blog โ€บ How We Spec Cushioning for Drop Tests

    Engineering

    How We Spec Cushioning for Drop Tests

    A drop test is not a formality. When a parcel leaves your dock it will be dropped, tossed onto a belt, and stacked in a truck, and the insert is the only thing standing between that abuse and your product. Spec’ing cushioning well means the product arrives intact; spec’ing it by feel means you learn the hard way, one damaged return at a time.

    Here is how we translate three inputs โ€” fragility, weight, and drop height โ€” into a concrete spec: a foam type, a thickness, and a bearing area. The goal is simple to state and precise to execute: keep the peak deceleration the product feels below the point where it breaks.

    Start with fragility: the G-factor

    Every product has a fragility rating expressed as a G-factor โ€” the number of g’s of deceleration it can survive before something fails. A rugged hand tool might tolerate 100 g or more. A hard drive or a bare sensor assembly might fail below 40 g. The lower the G-factor, the more cushioning the product needs. If you do not have a measured fragility value, we estimate from the product class and design with margin, then confirm on a physical sample.

    Add weight and drop height

    Weight sets how much energy the cushion has to absorb, and drop height sets how fast the product is moving at impact. A heavier product at a taller drop delivers more energy, which pushes you toward firmer, thicker foam. Drop height is not a guess: it is defined by the shipping standard for your parcel’s weight class, which is why we design against a target rather than a hunch.

    Turn inputs into a spec

    The three inputs map onto three outputs. Foam type and density set the cushion curve. Thickness sets how much distance the product has to decelerate over โ€” more thickness lowers peak g’s, up to a point. Bearing area, the footprint of foam under the product, sets the static loading; too little area and the foam bottoms out, too much and it is too stiff to cushion. We tune all three together so the product lands in the sweet spot of the foam’s performance curve.

    InputDrives which output
    Fragility (G-factor)Foam type and target peak deceleration
    Product weightFoam density and bearing area
    Drop heightFoam thickness
    Number of impactsClosed-cell choice for repeat recovery
    Key Takeaway

    Cushioning is an engineering problem, not a guess. Fragility sets the foam type, weight sets density and bearing area, and drop height sets thickness. Get those three right and the product stays under its failure threshold on every drop of the test.

    Design against ISTA

    ISTA test procedures โ€” such as the widely used ISTA 3A for parcel shipments โ€” define the drop heights, drop sequences, and impact orientations a package must survive. We design cushioning against the relevant ISTA target for your weight class so the insert is built to pass a recognized standard, not just to look protective. That gives you a defensible spec to show retailers, carriers, and quality teams.

    Prove it on a real sample

    Calculations set the starting point; a physical prototype confirms it. Because we hold a ยฑ0.5 mm tolerance, the sample you approve matches production, so a drop result on the prototype carries through to the run. We cut a proof in 24โ€“48 hours, you test the fit and protection, and we adjust density or thickness before committing to production in 7โ€“10 business days.

    Have a drop-test target to hit?

    Send your product weight, fragility, and the standard you need to pass. We will engineer the cushioning and cut a proof to test.

    Get a Custom Quote

    Keep reading

    To pick the foam family behind the spec, read PE, PU, EVA & ESD Foam Explained. Still deciding between materials? See Foam vs. Cardboard Inserts: How to Choose. When you are ready to gather everything we need, use our spec checklist, or browse the products page.

    undefined
  • ESD Foam for Electronics: When You Actually Need It

    ESD Foam for Electronics: When You Actually Need It โ€” Custom Box Inserts
    Call or Text us: (929) 605-4397 โ€” free design proof in 24โ€“48 hours

    Home โ€บ Blog โ€บ ESD Foam for Electronics

    Electronics

    ESD Foam for Electronics: When You Actually Need It

    Electrostatic discharge is invisible, instant, and expensive. A charge you cannot feel can degrade or destroy a semiconductor, and the failure often shows up later as a field return rather than a dead unit on the bench. ESD foam exists to prevent that โ€” but it is not something every electronic product needs, and treating it as a blanket upgrade wastes money.

    This guide explains the two grades of anti-static foam, the surface resistivity ranges that define them, and a clear rule for which products genuinely require protection and which do not.

    Static-dissipative vs conductive

    Anti-static foam comes in two working grades. Static-dissipative foam lets a charge bleed away slowly and in a controlled way, which prevents the sudden discharge that damages components. Conductive foam moves charge quickly and can also shield contents, and it is used for the most sensitive bare components and for grounding leads. Both keep the product and its surroundings at a safe common potential; they differ in how fast they move charge and how much shielding they provide.

    Read it by surface resistivity

    The grades are defined by surface resistivity, measured in ohms per square. Lower resistivity means charge moves more freely. The ranges below are the industry reference points we use when specifying material.

    GradeSurface resistivity (ohms/sq)
    ConductiveLess than 1 ร— 10โต
    Static-dissipative1 ร— 10โต to 1 ร— 10ยนยน
    Insulative (not ESD-safe)Greater than 1 ร— 10ยนยน
    GradeTypical use
    ConductiveBare boards, sensitive ICs, grounding, shielding
    Static-dissipativeAssembled devices, drives, controlled charge bleed
    Insulative (not ESD-safe)Non-sensitive products; do not use near bare parts
    Key Takeaway

    Use conductive foam for bare, highly sensitive components and grounding, static-dissipative foam for assembled electronics that still need controlled charge bleed, and standard foam for anything sealed and non-sensitive. Match the grade to the exposure, not to the whole catalog.

    Which products actually need it

    The deciding question is exposure of sensitive circuitry. If bare boards, exposed connector pins, unpackaged semiconductors, hard drives, or sensor assemblies contact the insert, use ESD foam. Repair and RMA programs that ship boards on their own are a clear case. So are components sold to be integrated by another manufacturer.

    If the electronics are fully enclosed in a sealed plastic housing with no exposed contacts โ€” a finished consumer gadget in its shell, for example โ€” the housing already provides meaningful protection, and standard cushioning foam is usually adequate. When there is doubt, we default to static-dissipative because the cost of protection is far lower than the cost of a static-damaged return.

    Shipping bare boards or sensitive assemblies?

    Tell us what is exposed and we will spec the right ESD grade, then cut a free proof in 24โ€“48 hours.

    Get a Custom Quote

    Keep reading

    ESD is one of four foams we cut โ€” see the full lineup in PE, PU, EVA & ESD Foam Explained. To make sure the same insert also survives the trip, read How We Spec Cushioning for Drop Tests. Our anti-static and other foam options are on the products page.

    undefined
  • How to Order Custom Box Inserts: A Spec Checklist

    How to Order Custom Box Inserts: A Spec Checklist โ€” Custom Box Inserts
    Call or Text us: (929) 605-4397 โ€” free design proof in 24โ€“48 hours

    Home โ€บ Blog โ€บ How to Order Custom Box Inserts: A Spec Checklist

    Buyer Guides

    How to Order Custom Box Inserts: A Spec Checklist

    The difference between a quote that comes back in a day and one that stalls for a week is usually the brief. When we have the right information up front, we can design the insert, cut a proof, and price the run without a back-and-forth. When key details are missing, every step waits on a follow-up email.

    This checklist covers the seven things we need to move fast. Gather them once, send them together, and you will have a design proof in 24โ€“48 hours instead of a thread of clarifying questions.

    The seven inputs we need

    InputWhat to send
    1. Product dimensionsLength ร— width ร— height of each item, in mm or inches
    2. Product weightWeight per item and total loaded weight
    3. FragilityWhat breaks it; a G-factor if you have one
    4. Box / cartonInside dimensions of the shipping box or case
    5. Material preferenceFoam, board, or “recommend one” โ€” plus ESD if relevant
    6. QuantityPrototype count and expected run size (MOQ 25)
    7. DeadlineWhen you need parts in hand

    Get the dimensions right

    Measure each product at its widest points and send length, width, and height. If items nest or stack, note that too. Just as important is the inside dimension of the box the insert has to fit โ€” not the outside. A few millimeters of error here changes the whole cavity layout, so when a measurement is uncertain, tell us, or send a physical sample and we will measure it against our ยฑ0.5 mm tolerance.

    Describe weight and fragility together

    Weight tells us how much the cushioning has to carry; fragility tells us how gently it has to stop. Send both. You do not need a lab-measured G-factor โ€” a plain description works, such as “glass, cracks easily” or “sealed metal housing, rugged.” If the product must pass a specific drop or ISTA test, name it, and we will engineer to that target.

    Key Takeaway

    Send seven things: product dimensions, weight, fragility, the box’s inside dimensions, a material preference, quantity, and your deadline. With those in hand we can return a CAD proof in 24โ€“48 hours and price the run in the same pass.

    Tell us material, quantity, and deadline

    If you know whether you want foam or board, say so; if not, ask us to recommend one and we will. Flag ESD needs early, since anti-static material changes the spec. On quantity, our minimum is 25, so send both your prototype count and the run size you expect โ€” volume pricing improves as the run grows. Finally, give us a real deadline. Standard production is 7โ€“10 business days after approval; if you are tighter than that, tell us up front so we can plan a rush.

    Files help, but are not required

    A CAD file or a dimensioned drawing speeds design, and a photo with a ruler for scale is genuinely useful. But none of it is mandatory. If you have no files at all, send us a sample product and we will measure and design from it. The point of the checklist is not paperwork โ€” it is giving us enough to get the fit right the first time.

    Have your specs ready?

    Send the seven inputs and we will return a design proof and quote โ€” usually within one business day.

    Get a Custom Quote

    Keep reading

    Not sure which material to request? Read Foam vs. Cardboard Inserts: How to Choose. Shipping something fragile and want to understand how we engineer the cushion? See How We Spec Cushioning for Drop Tests. Or browse insert types on the products page before you brief us.

    undefined
  • Designing Insert Programs for Subscription Boxes

    Designing Insert Programs for Subscription Boxes โ€” Custom Box Inserts
    Call or Text us: (929) 605-4397 โ€” free design proof in 24โ€“48 hours

    Home โ€บ Blog โ€บ Designing Insert Programs for Subscription Boxes

    Retail

    Designing Insert Programs for Subscription Boxes

    A subscription box lives or dies on two things: the unboxing and the unit economics. The insert sits at the center of both. It stages the reveal that customers photograph and share, and it is a recurring cost that either compounds against your margin or works in your favor. Designing an insert program โ€” not a one-off insert โ€” is how you get both right at once.

    This is a look at how we build repeatable die-cut board insert programs for subscription brands: how to think about the layout, how volume drives cost down, and how to keep every month on-brand without re-tooling from scratch.

    Design the program, not the box

    Subscription boxes change contents every cycle, but the outer carton and the insert footprint usually do not. The winning move is to design a base insert platform โ€” a fixed tray or partition footprint sized to your standard carton โ€” with defined cells that flex to different products. Curate each month’s items into those cells rather than redesigning the insert each time. That turns a monthly scramble into a repeatable spec and keeps tooling costs amortized across many runs.

    Why die-cut board is the right tool

    For most subscription boxes, die-cut corrugated board is the material of choice. It is fully recyclable, which matters to the audiences subscription brands court. It takes print and finishing well, so the insert becomes a branded surface rather than filler. And at subscription volumes it is inexpensive per unit. We work across E, B, C, and double-wall flutes, so the board can be thin and precise for staging or heavier for weight-bearing trays.

    Unit cost drops as volume climbs

    Die-cutting has a fixed tooling cost and a low per-piece cost, which is exactly the shape you want for a recurring program. The tooling is paid once; every run after that rides the low marginal cost. The table shows how the same insert behaves as your run size grows.

    Run sizeRelative unit cost
    Prototype (from 25)Highest โ€” proof and fit validation
    Launch (hundreds)Lower โ€” tooling begins to amortize
    Steady state (thousands)Low โ€” marginal cost dominates
    Scale (10,000+)Lowest โ€” best per-unit economics
    Key Takeaway

    Design a fixed insert platform that flexes to changing contents, cut it in recyclable die-cut board, and run it at volume. You get a brand-forward reveal every month and a unit cost that falls as your subscriber base grows.

    Stage a reveal worth sharing

    The insert controls the order in which a subscriber sees things. Raised trays, a hero cell for the headline product, and a printed top layer that greets the customer all turn a box of items into a sequence. Because the platform is repeatable, you can vary the printed message or the accent color month to month while the structure stays constant โ€” fresh on the surface, efficient underneath.

    Lock quality across every run

    A subscription program only works if month three looks like month one. Our ยฑ0.5 mm tolerance keeps every cell dimensionally identical, so curated products drop in cleanly on every cycle. We start with a free proof so you approve the staging before launch, then produce each recurring run in 7โ€“10 business days on a schedule that fits your ship dates. Minimums start at 25, so you can validate the design before scaling.

    Building a subscription program?

    Share your carton size and a sample month of contents. We will design a repeatable insert platform and cut a free proof in 24โ€“48 hours.

    Get a Custom Quote

    Keep reading

    Weighing board against foam for your contents? Read Foam vs. Cardboard Inserts: How to Choose. Ready to brief us? Use the spec checklist to gather everything in one pass. Explore die-cut trays and partitions on the products page.

    undefined